
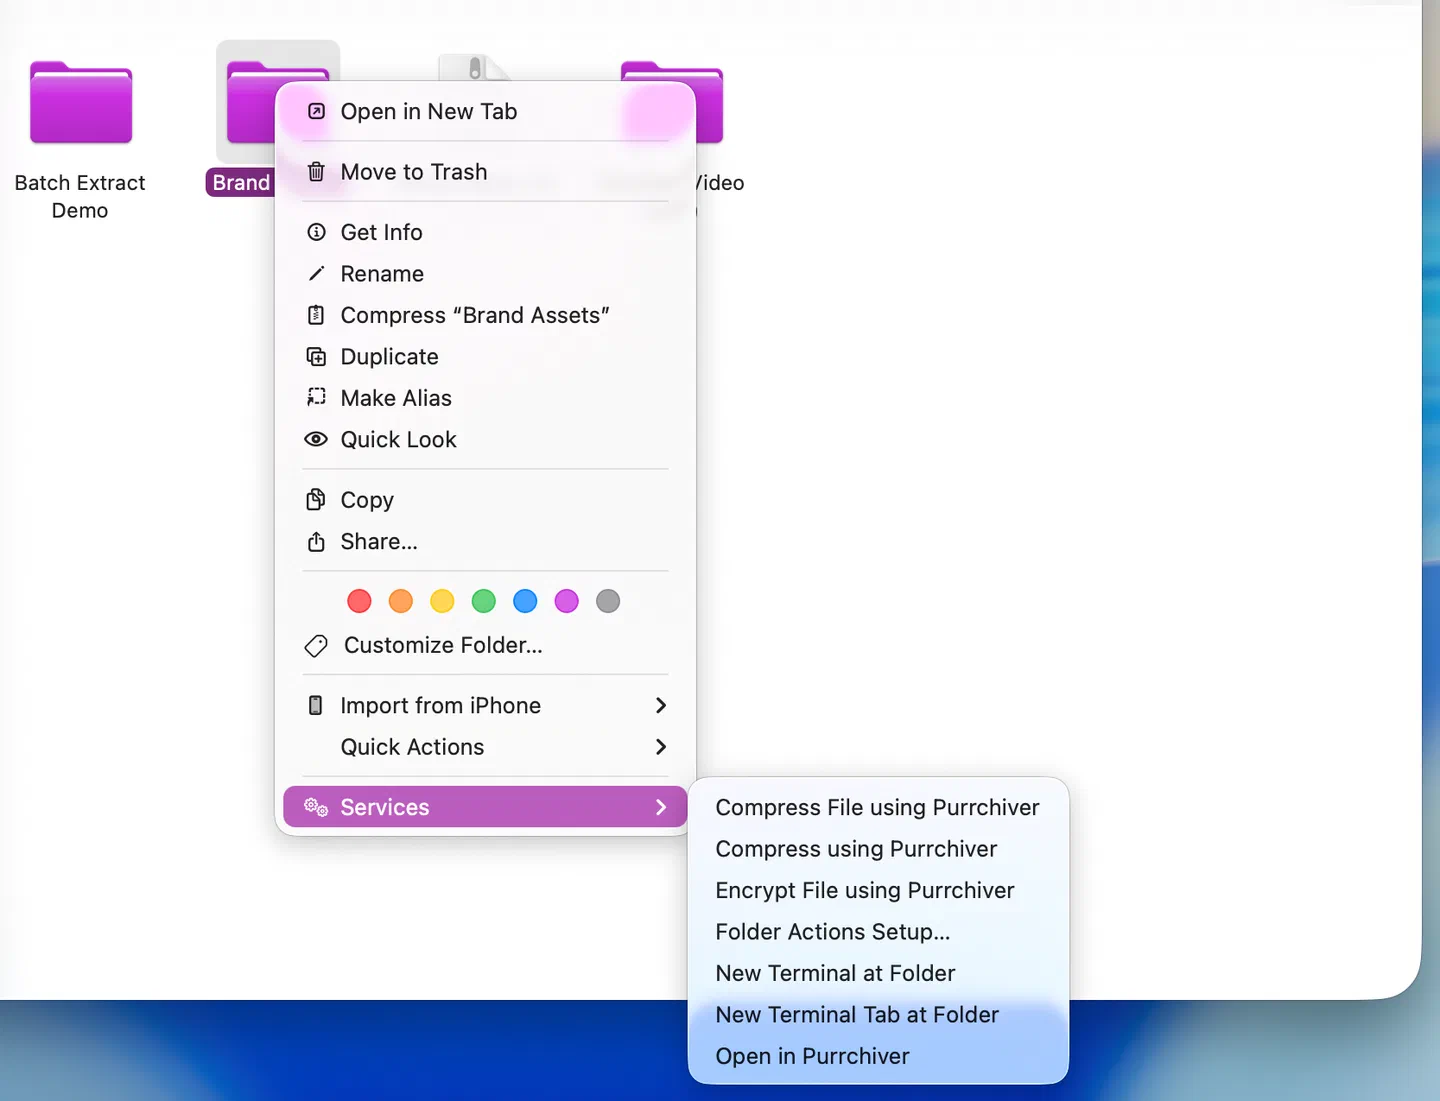
Purrchiver registers five items in the macOS Services menu — so you can act on a Finder selection without leaving the window you’re in. No setup required; they appear automatically the first time you launch Purrchiver. macOS controls visibility per-item under System Settings → Keyboard → Keyboard Shortcuts → Services.
The five Services
Right-click a file or folder in Finder → Services (you may need to scroll to it), or use the active app’s menu bar → app-name → Services:
| Item | What it does |
|---|---|
| Open in Purrchiver | Smart dispatch. For a single archive it honors your double-click default action (Open in Browse / Extract to parent / Ask each time) — unlike Extract using, which ignores that preference. Multiple archives open in Batch Extract; any non-archive selection opens a new Compress staging window. The right default if you’re not sure which verb you want. |
| Extract using Purrchiver | Force-extract. Each selected archive extracts to its sibling folder (~/Downloads/photos.zip → ~/Downloads/photos/). One Purrchiver window opens with the queue + progress bar. Available only when every selected item is an archive. |
| Compress using Purrchiver | Force-compress. The selection opens in a new Compress staging window — pick a format, an optional password, and hit Create. Works on any selection (files, folders, or even other archives if you want to nest them). |
| Compress File using Purrchiver | Single-file compress. Opens staging primed for gzip — which is free to create — with the other stream formats (xz, Zstandard, Brotli, …) a switch away. The standalone-stream counterpart to “Compress using.” |
| Encrypt File using Purrchiver | Single-file encrypt. Opens staging primed to wrap the selection in a passphrase-based age envelope. |
All five Services run in-process inside Purrchiver itself — no
separate extension to install or enable. They’re declared via the
standard NSServices array in Purrchiver’s Info.plist, the same
pattern Keka and most native Mac apps use.
Most of these are free. Open, Extract, and Compress cover the free workflow, and Compress File opens primed for free gzip — it only crosses into the one-time $9.99 unlock if you switch it to an advanced stream format. Encrypt File is the one that always lands in paid territory, since it seeds an age envelope. See What’s free vs. the unlock.
Keyboard shortcuts
Purrchiver ships no default shortcuts on the Services — assigning them is up to you. Open System Settings → Keyboard → Keyboard Shortcuts → Services, scroll to the Files and Folders group, and click “add shortcut” next to any Purrchiver item.
We don’t default to anything because the obvious choices (⌃⇧X for Extract, ⌃⇧C for Compress) would collide with other archive utilities people may have installed. Your machine, your bindings.
Set Purrchiver as the default app for an archive format
Double-clicking an archive in Finder uses your default app for that file type. To make that default Purrchiver:
- Right-click an archive file in Finder.
- Choose Get Info (⌘I).
- Expand Open with.
- Choose Purrchiver from the dropdown.
- Click Change All… to apply to every file with this extension.
Repeat per format. The most common ones to set:
.zip.rar.7z.tar.gz/.tgz.tar
What happens on double-click is controlled separately by Settings → General → When I double-click an archive in Finder — see below.
Hiding specific Services
To hide any of these items from the Services menu, open System Settings → Keyboard → Keyboard Shortcuts → Services, find the item under Files and Folders, and uncheck it. macOS owns this list — Purrchiver doesn’t have its own per-item toggle pane.
To hide them all at once, uncheck each of them in the same Services list — there’s no single master toggle, because they’re declared in-process rather than as a separate extension.
Default double-click behavior
In Settings → General, you can choose what happens when you double-click an archive in Finder (assuming Purrchiver is the default):
- Open in Purrchiver to inspect — opens Purrchiver in Browse mode so you can inspect contents before extracting. The safe default; matches what most users expect from a double-click.
- Extract to parent folder — bypasses Browse, extracts directly to a sibling folder. Fastest if you treat archives as “open this so I can use the files.”
- Ask each time — shows a small dialog with both options. The right choice if you do a mix.
The Extract using Purrchiver Service ignores this preference — it always extracts to the sibling folder. The preference only affects double-click and drag-to-dock dispatch.
Tips
- Use “Open in Purrchiver” by default. The smart dispatch is right more often than not, especially for mixed selections.
- Use “Extract using Purrchiver” for batches. Select 5 RARs in Finder → right-click → Extract using Purrchiver. They all extract in one Batch Extract window with per-row progress.
- Use “Compress using Purrchiver” to seed a new archive from a Finder selection. It opens a Compress staging window with your selection pre-loaded — review the contents, then click Create Archive to pick the format and finish.
Related
- Opening an archive
- Extracting files
- Creating a new archive
- Batch extract
- Settings — change default double-click behavior